So hubby the kids and I are all going to head out camping in a few weeks (middle August)and I will of course not be blogging.... Sorry. But I wanted to know if any of you would like to guest blog???... Do a feature of yourself and your blog, a tutorial or both.
If anyone is interested let me know just e-mail me at katepixleydesign@hotmail.ca and we can arrange it... I will do a preset of my blog post so they will need to be in earlier than my leaving date.
Anyways have a great weekend!!!

Friday, August 6, 2010


Towel Hanger Tutorial
MAKE SURE YOU ENTER THE GIVEAWAY FOR ONE BEAUTIFUL APRON! THE WINNER WILL BE ANNOUNCED ON AUGUST 12TH, 2010.
Hey Guys I posted this tutorial over at Crystals Craft Spot but I really wanted it in my list as well so I am posting it here too!!!
Here is the tutorial for how to make a perfect towel hanger for your kids room... I wanted something unique for my kids rooms and I stumbled across a blog Aly&Ash and she had this great idea. I made one for Joshua's room and one for Peytons: Here is the easy 30 minute craft you all can do.
Supplies
-Wood frame from Michaels or your local craft store
-Mod Podge
-Sponge Brush
-Scrapbook paper of your liking
-garnishments (a letter, ribbon, Pearls or rhinestones)
-Dresser knob of your choosing from your local hardware store
-An adorable picture of your baby!
Start off by tracing your frame onto your paper
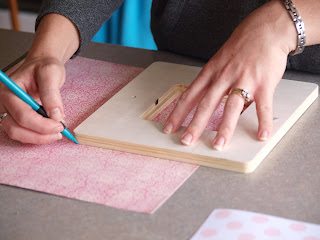
Then cut it out and take the mod podge and place a thin layer all over the front of the frame... I used a thin layer with Joshua's frame and then a thicker layer with Peyton's and it wasn't as nice...I don't have pictures but I was actually disappointed at first and almost started over.

Let it dry
Add a thin layer on top of the paper
Let it dry
Add another thin layer
hmm... and you guessed it let it dry
Then add your letter or pearls or whatever you would like... I chose to mod podge my picture to the cardboard backing but you don't have to.
The last thing that you will do is drill a hole through the frame and place your knob on... I don't have a picture because... OK the truth... my husband moved my craft stuff from the kitchen island to the dinning room table, in that move the screw for my glass knob was lost... I looked all over then in frustration I super glued it to the frame... and it worked like a charm!!! I searched for weeks for the right embellishment, I looked a ribbon or more paper but then stumbled across these pearls and I love it...


Here is Joshua's...Again He loves soccer but has a red white and blue room...

Hey Guys I posted this tutorial over at Crystals Craft Spot but I really wanted it in my list as well so I am posting it here too!!!
Here is the tutorial for how to make a perfect towel hanger for your kids room... I wanted something unique for my kids rooms and I stumbled across a blog Aly&Ash and she had this great idea. I made one for Joshua's room and one for Peytons: Here is the easy 30 minute craft you all can do.
Supplies
-Wood frame from Michaels or your local craft store
-Mod Podge
-Sponge Brush
-Scrapbook paper of your liking
-garnishments (a letter, ribbon, Pearls or rhinestones)
-Dresser knob of your choosing from your local hardware store
-An adorable picture of your baby!
Start off by tracing your frame onto your paper

Then cut it out and take the mod podge and place a thin layer all over the front of the frame... I used a thin layer with Joshua's frame and then a thicker layer with Peyton's and it wasn't as nice...I don't have pictures but I was actually disappointed at first and almost started over.

Let it dry
Add a thin layer on top of the paper
Let it dry
Add another thin layer
hmm... and you guessed it let it dry
Then add your letter or pearls or whatever you would like... I chose to mod podge my picture to the cardboard backing but you don't have to.
The last thing that you will do is drill a hole through the frame and place your knob on... I don't have a picture because... OK the truth... my husband moved my craft stuff from the kitchen island to the dinning room table, in that move the screw for my glass knob was lost... I looked all over then in frustration I super glued it to the frame... and it worked like a charm!!! I searched for weeks for the right embellishment, I looked a ribbon or more paper but then stumbled across these pearls and I love it...


Here is Joshua's...Again He loves soccer but has a red white and blue room...

APRON GIVEAWAY!!!
Okay as promised...
Yesterday was a big day, we went from 22 followers to 30!!!! WOW! How excited and Happy am I to have such wonderful people!!!
So as a big thank you I am going to be giving away one of my aprons just like the one in the picture (thanks mom for being such a beautiful model.) This is a reversible apron and a value of $45!!! (not a big surprise to those who have been following me for a few weeks now as I have been talking about this in almost every post.


So here are the rules:
1. Become a follower and make a comment on this post saying that you are (1 entry)
2. Facebook or Twitter about my giveaway and leave a comment (2 entries)
3. Blog about my giveaway and leave a comment with a link to your post (3 entries)
The GIVEAWAY closes on August 14th 2010 at midnight.
GOOD LUCK!
Yesterday was a big day, we went from 22 followers to 30!!!! WOW! How excited and Happy am I to have such wonderful people!!!
So as a big thank you I am going to be giving away one of my aprons just like the one in the picture (thanks mom for being such a beautiful model.) This is a reversible apron and a value of $45!!! (not a big surprise to those who have been following me for a few weeks now as I have been talking about this in almost every post.


So here are the rules:
1. Become a follower and make a comment on this post saying that you are (1 entry)
2. Facebook or Twitter about my giveaway and leave a comment (2 entries)
3. Blog about my giveaway and leave a comment with a link to your post (3 entries)
The GIVEAWAY closes on August 14th 2010 at midnight.
GOOD LUCK!
Thursday, August 5, 2010
Come take a look at my Guest Post
Hi guys I am guest posting today at Crystals Craft Spot... Come take a look and check out her blog...
I have a great little tutorial to share with everyone over there... so come on and take a look!!!
I have a great little tutorial to share with everyone over there... so come on and take a look!!!
Wednesday, August 4, 2010
AHHH! My First Guest Blogger!!! Meet Crystal
Hi Everyone! I am so excited to blog swap with Kati today. I just love her cute blog and great craft ideas.
I am Crystal from Crystal's Craft Spot. Its my little spot to share my current craft projects, tutorials, recipes, and ideas I want to use in the future. I have also started a craft challenge every Wednesday and Feature yourself Friday that I would love for you to join. I try to post something new almost everyday and I enjoy a variety of crafts. It is my way to relax and take a break from a busy day. Here's a little more about me:
 I've been married for 5 1/2 years to the greatest guy ever.
 I am a stay at home mom of two adorable little girls (4 and 2). I teach my daughter preschool at home and we post our fun activities and crafts on our preschool blog.
I love to read, and watch movies
I love Blogs! I love looking at others for crafty inspiration, I love staying in touch with old friends and making new friends
Here are some of my favorite projects you will find on my blog:


Now for the fun part! Today I'm going to share with you how to make a simple growth chart. I LOVE growth charts and have been wanting one for a long time. However I just couldn't bring myself to pay for one. (sad I know). Recently I saw a board laying around and I knew it would be perfect for this project. I made mine to fit all of our kids measurements on one board (fun to compare!). With that in mind I made mine gender neutral (maybe one day we will have a boy:) and with plenty of space to write. I love this project because you can easily customize it to fit your taste and decor. Here's how I made mine.

You need:
a long board (what ever size you want)
paint
paint pen
pattern paper
mod podge
Paint your board. Sand the edges to distress a bit

Decide what number you want to start and stop on. Mine goes from 1.5 feet to 6 feet. Use a paint pen to mark your lines, I did every inch.

Cut out your numbers from pattern paper. I used my cricut but you can easily do it by hand or with the computer. Attach with mod podge. (apply a layer on your board. Place your paper where you want it. Then apply another layer of top of your paper.) You can embellish it any way you want. My board is really skinny so I kept it simple. Remember you want room to write your children's measurements.

Here's my finished board. I still need to attach a hook or ribbon to the back to hang.

Come by Crystal's Craft Spot anytime for more crafts and tutorial. Thanks again for letting me stop by. Its been a lot of fun!
Tuesday, August 3, 2010
A Cozy Case for My Cell Phone
As I posted earlier I made a Camera Case for my new camera that I got this weekend... well I decided that my blackberry which has been abused but loved deserved a little pretty spot... So I took some of my Peonie Pins and Sophie Pillow fabric and created a pretty little gem of a Cozy Case.
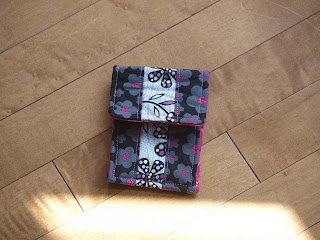
Even though I have used this fabric a lot I still like the patterns and the colour combinations....

In case you were wondering, yes my phone has pictures of my kids on it, I ordered it from a store called TEGO and you can upload your pictures, use words and generally create awesome skins for your phone. I uploaded a picture I love of my babies and all the words that they were speaking at the time. I have Ma (Peyton, Mummy (Joshua) bye bye, love you, hello and puppy... as well as their names... I am so in love with it... and I really want to protect it and I have noticed that it is really starting to take a beating in my purse... another reason for a Cozy Case... hmmm... what else could I make these for OH I know and Ipod... hubby has one of those... guess I will have to make it a little more masculine.

Even though I have used this fabric a lot I still like the patterns and the colour combinations....

In case you were wondering, yes my phone has pictures of my kids on it, I ordered it from a store called TEGO and you can upload your pictures, use words and generally create awesome skins for your phone. I uploaded a picture I love of my babies and all the words that they were speaking at the time. I have Ma (Peyton, Mummy (Joshua) bye bye, love you, hello and puppy... as well as their names... I am so in love with it... and I really want to protect it and I have noticed that it is really starting to take a beating in my purse... another reason for a Cozy Case... hmmm... what else could I make these for OH I know and Ipod... hubby has one of those... guess I will have to make it a little more masculine.
New Camera Needs a Case.... DONE!
Hello All!
So this weekend my hubby and I bought a inexpensive camera (which I love) as just a quick point and shoot, take to the park and beach, have to lug around in my purse just for those kodak moments. Well being inexpensive it had no camera case and it needed one... so being the new crafty that I am I whipped one up between breakfast, snack, potty training and all other things mommy....

I have always wanted a red camera... so here is a picture of my camera... I think that it really likes it's new home.

Here is how I made this:
I actually just placed my camera on the fabric, folded it as though it was in a case and then gave a 1/2 inch seem allowance. I then cut two strips of fabric same size, then quilting batting in the same size as the fabric... Quilted the opink fabric to the batting... then sewed the green fabric on top of the pink, I left an opening and then pulled it out like a pillow... then sewed around the edges and did an elastic for the button.... I did a blind stich for the button. Honestly I think I will do a real button hole for my next one... not in love with the way this one sits...
So there you have it... e-mail me if you have any questions.
I am linking to:

So this weekend my hubby and I bought a inexpensive camera (which I love) as just a quick point and shoot, take to the park and beach, have to lug around in my purse just for those kodak moments. Well being inexpensive it had no camera case and it needed one... so being the new crafty that I am I whipped one up between breakfast, snack, potty training and all other things mommy....

I have always wanted a red camera... so here is a picture of my camera... I think that it really likes it's new home.

Here is how I made this:
I actually just placed my camera on the fabric, folded it as though it was in a case and then gave a 1/2 inch seem allowance. I then cut two strips of fabric same size, then quilting batting in the same size as the fabric... Quilted the opink fabric to the batting... then sewed the green fabric on top of the pink, I left an opening and then pulled it out like a pillow... then sewed around the edges and did an elastic for the button.... I did a blind stich for the button. Honestly I think I will do a real button hole for my next one... not in love with the way this one sits...
So there you have it... e-mail me if you have any questions.
I am linking to:
Subscribe to:
Posts (Atom)